Software Development
The entire development lifecycle is done in-house with transparent project management and customer involvement. We have proven experience in a wide range of industries, including industrial automation and custom solutions for consumer electronics. This section helps you step by step initiating the software development process:
1. Where do you get the toolchain?
1.1 byteDEVKIT
- Yocto 3.0 Download LINK: https://download.bytesatwork.io/transfer/bytesatwork/m5/3.0/poky-bytesatwork-glibc-x86_64-bytesatwork-minimal-image-cortexa7t2hf-neon-vfpv4-bytedevkit-toolchain-3.0.2.sh
- Yocto 2.7 Download LINK: https://download.bytesatwork.io/transfer/bytesatwork/poky-bytesatwork-glibc-x86_64-devbase-image-bytesatwork-cortexa7t2hf-neon-vfpv4-bytedevkit-toolchain-2.7.1.sh
1.2 bytePANEL
- Yocto 3.0 Download LINK: https://download.bytesatwork.io/transfer/bytesatwork/m2/3.0/poky-bytesatwork-glibc-x86_64-bytesatwork-minimal-image-armv7at2hf-neon-bytepanel-emmc-toolchain-3.0.2.sh
- Yocto 2.7 Download LINK: https://download.bytesatwork.io/transfer/bytesatwork/poky-bytesatwork-glibc-x86_64-devbase-image-bytesatwork-armv7at2hf-neon-bytepanel-toolchain-2.7.3.sh
2. How do you install the toolchain?
2.1 byteENGINE STM32MP1x
Download the Toolchain and install it
./poky-bytesatwork-glibc-x86_64-bytesatwork-minimal-image-cortexa7t2hf-neon-vfpv4-bytedevkit-toolchain-3.0.2.sh
2.2 byteENGINE AM335x
Download the Toolchain and install it
./poky-bytesatwork-glibc-x86_64-bytesatwork-minimal-image-armv7at2hf-neon-bytepanel-emmc-toolchain-3.0.2.sh
Hint
If you encounter problems when trying to install the toolchain, make sure the downloaded toolchain is executable. Run chmod +x /<path>/<toolchain-file>.sh to make it executable.
3. How do you use the toolchain?
3.1 byteENGINE STM32MP1x
Source the installed Toolchain:
source /opt/poky-bytesatwork/3.0.2/environment-setup-cortexa7t2hf-neon-vfpv4-poky-linux-gnueabi
Check if Cross-compiler is available in environment:
echo $CC
You should see the following output:
arm-poky-linux-gnueabi-gcc -mthumb -mfpu=neon-vfpv4 -mfloat-abi=hard -mcpu=cortex-a7 -fstack-protector-strong -D_FORTIFY_SOURCE=2 -Wformat -Wformat-security -Werror=format-security --sysroot=/opt/poky-bytesatwork/3.0.2/sysroots/cortexa7t2hf-neon-vfpv4-poky-linux-gnueabi
Crosscompile the source code, e.g. by:
$CC helloworld.c -o helloworld
Check generated binary:
file helloworld
The output that is shown in prompt afterwards:
helloworld: ELF 32-bit LSB pie executable, ARM, EABI5 version 1
3.2 byteENGINE AM335x
Source the Toolchain
source /opt/poky-bytesatwork/3.0.2/environment-setup-armv7at2hf-neon-poky-linux-gnueabi
Check if Cross-compiler is available in environment:
echo $CC
You should see the following output:
arm-poky-linux-gnueabi-gcc -march=armv7-a -mthumb -mfpu=neon -mfloat-abi=hard --sysroot=/opt/poky-bytesatwork/3.0.2/sysroots/armv7at2hf-neon-poky-linux-gnueabi
Cross-compile the source code, e.g. by:
$CC helloworld.c -o helloworld
Check generated binary:
file helloworld
The output that is shown in prompt afterwards:
helloworld: ELF 32-bit LSB pie executable, ARM, EABI5 version 1
4. How to bring your binary to the target?
- Connect the embedded device’s ethernet to your LAN
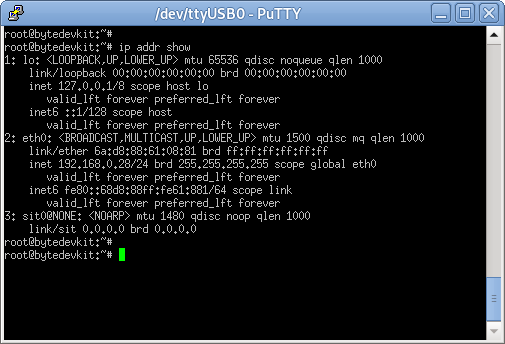
- determine the embedded target ip address by ip addr show
- scp your binary, e.g. hello world to the target by scp helloworld root@<ip address of target>:/tmp

- run chmod +x on the target to make your binary executable: chmod +x /<path>/<binary name>
- run your binary on the target: /<path>/<binary name>
5. Where do you get the Image for your SD-Card?
5.1 byteDEVKIT
- Yocto 3.0 Download LINK: https://download.bytesatwork.io/transfer/bytesatwork/m5/3.0/bytesatwork-minimal-image-bytedevkit.wic.gz
- Yocto 2.7 Download LINK: https://download.bytesatwork.io/transfer/bytesatwork/m5/2.7/flashlayout_bytesatwork-minimal-image_FlashLayout_sdcard_stm32mp157c-bytedevkit.raw.gz
5.2 bytePANEL
6. How do you flash the Image?
Attention
- You need is a micro-SD card with minimal 8GB capacity.
- All existing data on the micro-SD card will be lost.
- Do not format the micro-SD card before flashing.
6.1 byteDEVKIT
Yocto 3.0
WINDOWS
Unzip the <file.wic.gz> (e.g. with 7-zip)
Write the resulting <file.wic> to the uSD-card with a tool like Roadkils Disk Image: https://www.roadkil.net/program.php?ProgramID=12
LINUX
gunzip -c <file.wic.gz> | dd of=/dev/mmcblk<X> bs=8M conv=fdatasync status=progress
Hint
To improve write performance, you could use bmap-tools under Linux:
bmaptool copy <file.wic.gz> /dev/mmcblk<X>
Yocto 2.7
WINDOWS
Unzip the <file.raw.gz> (e.g. with 7-zip)
Write the resulting <file.raw> to the uSD-card with a tool like Roadkils Disk Image: https://www.roadkil.net/program.php?ProgramID=12
LINUX
gunzip -c <file.raw.gz> | dd of=/dev/mmcblk<X> bs=8M conv=fdatasync status=progress
6.2 bytePANEL
Yocto 3.0
WINDOWS
Unzip the <file.wic.gz> (e.g. with 7-zip)
Write the resulting <file.wic> to the uSD-card with a tool like Roadkils Disk Image: https://www.roadkil.net/program.php?ProgramID=12
LINUX
gunzip -c <file.wic.gz> | dd of=/dev/mmcblk<X> bs=8M conv=fdatasync status=progress
Hint
To improve write performance, you could use bmap-tools under Linux:
bmaptool copy <file.wic.gz> /dev/mmcblk<X>
Yocto 2.7
WINDOWS
Unzip the <file.sdimg.gz> (e.g. with 7-zip)
Write the resulting <file.sdimg> to the uSD-card with a tool like Roadkils Disk Image[https://www.roadkil.net/program.php?ProgramID=12]
LINUX
gunzip -c <file.sdimg.gz> | dd of=/dev/mmcblk<X> bs=8M conv=fdatasync status=progress
7. How do you build an image?
7.1 byteDEVKIT
Yocto 3.0
Use repo to download all necessary repositories:
repo init -u https://github.com/bytesatwork/bsp-platform-st.git -b zeus
repo sync
If those commands are completed successfully, the following command will setup a Yocto Project environment for byteDEVKIT:
MACHINE=bytedevkit DISTRO=poky-bytesatwork EULA=1 . setup-environment build
The final command builds the development image:
bitbake bytesatwork-minimal-image
The output is found in:
tmp/deploy/images/bytedevkit
Hint
For additional information about yocto images and howto build them, please visit: https://www.yoctoproject.org/docs/3.0/mega-manual/mega-manual.html#brief-building-your-image
Yocto 2.7
Use repo to download all necessary repositories:
repo init -u https://github.com/bytesatwork/bsp-platform-st.git -b warrior
repo sync
If those commands are completed successfully, the following command will setup a Yocto Project environment for byteDEVKIT:
MACHINE=bytedevkit DISTRO=poky-bytesatwork EULA=1 . setup-environment build
The final command builds the development image:
bitbake devbase-image-bytesatwork
The output is found in:
tmp/deploy/images/bytedevkit
7.2 bytePANEL
Yocto 3.0
Use repo to download all necessary repositories:
repo init -u https://github.com/bytesatwork/bsp-platform-ti.git -b zeus
repo sync
If those commands are completed successfully, the following command will setup a Yocto Project environment for bytePANEL:
MACHINE=bytepanel DISTRO=poky-bytesatwork EULA=1 . setup-environment build
the final command builds the development image:
bitbake bytesatwork-minimal-image
The output is found in:
tmp/deploy/images/bytepanel
Hint
For additional information about yocto images and howto build them, please visit: https://www.yoctoproject.org/docs/3.0/mega-manual/mega-manual.html#brief-building-your-image
Yocto 2.7
Use repo to download all necessary repositories:
repo init -u https://github.com/bytesatwork/bsp-platform.git -b warrior
repo sync
If those commands are completed successfully, the following command will setup a Yocto Project environment for bytePANEL:
MACHINE=bytepanel DISTRO=poky-bytesatwork EULA=1 . setup-environment build
the final command builds the development image:
bitbake devbase-image-bytesatwork
The output is found in:
tmp/deploy/images/bytepanel
7.3 How to modify the image
- bytesatwork delivers tips for customizing an image
The image recipes can be found in sources/meta-bytesatwork/recipes-core/images
This is relative to where you started you repo command to check out all the sources.
Edit the minimal-image recipe bytesatwork-minimal-image.bb
Add the desired software-package to IMAGE_INSTALL variable, for example add net-tools to bytesatwork-minimal-image.bb
Rebuild the image by:
bitbake bytesatwork-minimal-image
7.4 How to rename the image
If you want to rename or copy an image, simple rename or copy the image recipe by:
cp bytesatwork-minimal-image.bb customer-example-image.bb
7.5 Troubleshooting
Image size is to small
If you encounter that your image size is to small to install additional software, please have a look at the IMAGE_ROOTFS_SIZE variable under meta-bytesatwork/recipes-core/images/bytesatwork-minimal-image.bb. Increase the size if necessary.
8. How do you build a toolchain?
8.1 byteDEVKIT
Yocto 3.0
repo init -u https://github.com/bytesatwork/bsp-platform-st.git -b zeus
repo sync
If those commands are completed successfully, the following command will setup a Yocto Project environment for byteDEVKIT:
MACHINE=bytedevkit DISTRO=poky-bytesatwork EULA=1 . setup-environment build
The final command builds an installable toolchain:
bitbake bytesatwork-minimal-image -c populate_sdk
Yocto 2.7
repo init -u https://github.com/bytesatwork/bsp-platform-st.git -b warrior
repo sync
If those commands are completed successfully, the following command will setup a Yocto Project environment for byteDEVKIT:
MACHINE=bytedevkit DISTRO=poky-bytesatwork EULA=1 . setup-environment build
The final command builds an installable toolchain:
bitbake devbase-image-bytesatwork -c populate_sdk
8.2 bytePANEL
Yocto 3.0
repo init -u https://github.com/bytesatwork/bsp-platform-ti.git -b zeus
repo sync
If those commands are completed successfully, the following command will setup a Yocto Project environment for bytePANEL:
MACHINE=bytepanel DISTRO=poky-bytesatwork EULA=1 . setup-environment build
The final command builds an installable toolchain:
bitbake bytesatwork-minimal-image -c populate_sdk
Yocto 2.7
repo init -u https://github.com/bytesatwork/bsp-platform.git -b warrior
repo sync
If those commands are completed successfully, the following command will setup a Yocto Project environment for bytePANEL:
MACHINE=bytepanel DISTRO=poky-bytesatwork EULA=1 . setup-environment build
The final command builds an installable toolchain:
bitbake devbase-image-bytesatwork -c populate_sdk
8.3 How to modify your toolchain
Currently the bytesatwork toolchain is generated out of the bytesatwork-minimal-image recipe. If you want to add additional libraries and development headers to customize the toolchain, you need to modify the bytesatwork-minimal-image recipe. It can be found under sources/meta-bytesatwork/recipes-core/images
For example if you want to develop your own ftp client and you need libftp and the corresponding header files, edit the recipe bytesatwork-minimal-image.bb and add ftplib to the IMAGE_INSTALL variable.
This will provide the ftplib libraries and development headers in the toolchain. After adding additional software components, the toolchain needs to be rebuilt by:
bitbake bytesatwork-minimal-image -c populate_sdkThe newely generated toolchain will be available under:
tmp/deploy/sdkFor additional information, please visit: https://www.yoctoproject.org/docs/3.0.2/overview-manual/overview-manual.html#cross-development-toolchain-generation
8.4 Troubleshooting
Errors when building the toolchain
If you get the error below, please revert commit: 179c5cb7fd0f06970135187f1203507aa55d6bde in the poky repository (sources/poky). See also Bug 13338 https://bugzilla.yoctoproject.org/show_bug.cgi?id=13338.
ERROR: bytesatwork-minimal-image-1.0-r0 do_populate_sdk: Unable to install packages. Command '/home/daniel/workspace/bytesatwork/yocto/ti-m2-zeus/build/tmp/work/bytepanel_emmc-poky-linux-gnueabi/bytesatwork-minimal-image/1.0-r0/recipe-sysroot-native/usr/bin/apt-get  install --force-yes --allow-unauthenticated openssh-ssh openssh-sshd apt dpkg coreutils base-passwd dhcp-client target-sdk-provides-dummy shadow openssh-scp packagegroup-core-standalone-sdk-target packagegroup-core-boot vim openssh-sftp-server run-postinsts' returned 100:
Reading package lists...
Building dependency tree...
Reading state information...
Some packages could not be installed. This may mean that you have
requested an impossible situation or if you are using the unstable
distribution that some required packages have not yet been created
or been moved out of Incoming.
The following information may help to resolve the situation:

The following packages have unmet dependencies:
 target-sdk-provides-dummy : Conflicts: coreutils
E: Unable to correct problems, you have held broken packages.
